I’m working on a gold and silver dragonscale chainmaille bracelet, and I’m thinking a lot about what I’m doing. For those of you attempting to make this fantastic weave, I have 2 keys that will help you do it well and that will help your final piece come out right. (I’m assuming that you already know how to make dragonscale chainmaille.)
First: Ring Gauges
Without a doubt, the ring selections are the most important consideration for this weave.
You can use many combinations of larger and smaller rings as long as you pay close attention to 2 criteria.
- The smaller rings must be able to fit completely inside the larger ring (i.e., the outer diameter of the small rings must be less than the inside diameter of the large rings).
- The inside diameter of the smaller rings must be large enough for at least 4 of the larger rings to pass through them.
Currently, my favorite combination is for
- Larger rings: 18 gauge, 6 mm ID (shown below in silver)
- Smaller rings: 20 gauge, 4 mm ID (shown below in brass)
The tutorials at CG Maille are generally great, but one of the recommended specs for dragonscale won’t work for jewelry. The 18 gauge, 5.5 mm ID larger ring with 20 gauge, 4.0 ID smaller ring will make a very, very tight weave, so tight that when I tried it, the piece had almost no flexibility. If you do the math, you’ll see that the outer diameter of the small rings is 5.62 mm, which is bigger than the 5.5 mm ID of the larger rings. This combination doesn’t meet the first criterion. As a result, only a portion of the smaller ring fits through the larger ring, which is why the weave was so tight.
With a weave this rigid, the resulting piece won’t wrap around a wrist for a bracelet. I increased the larger ring from 5.5 mm ID to 6 mm ID, and the weave came out great. You can see the result in the images below.
Second: Layering
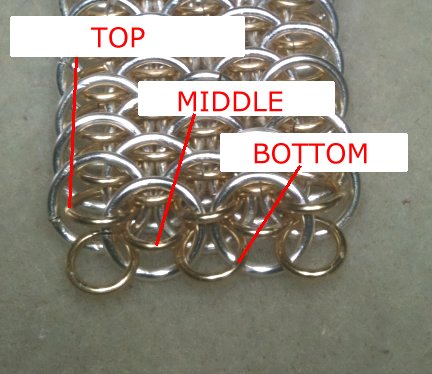
The second key to making great dragonscale chainmaille is to pay close attention to how the rings lay. As you add rows of rings, any new small rings need to lay BELOW any previous small rings. Otherwise, the weave will become distorted.
Here’s what they should look like:
If you look at the image carefully, you see the following:
- The top row of small rings is attached 2 rows back
- The middle row of small rings is attached 1 row back
- The bottom row of small rings is attached to the current row
After completing each row of rings, I double check the pattern and make sure all the small rings are in the right place. If not, I may have to wiggle them around a bit to make sure the rings are layered correctly.
Here’s a ring that needs to be moved:
See that ring on the far left in the red box? It should be between the two rings next to it. I noticed that it was out of place. It is on a diagonal and not horizontal, which is a good clue that it isn’t placed correctly. I had to move it into the correct position. Currently, it is only attached to one ring in the previous row. If the weave is so tight that I can’t slip it into place, I could, instead, open it and reposition it.
That’s it. Pay attention to these two criteria, and your weave should come out beautifully.


Leave a comment